Back from the beer fridge and yet again there's vermin lying around dying in my living room, nothing to be done but expel the hosers one more time I suppose...
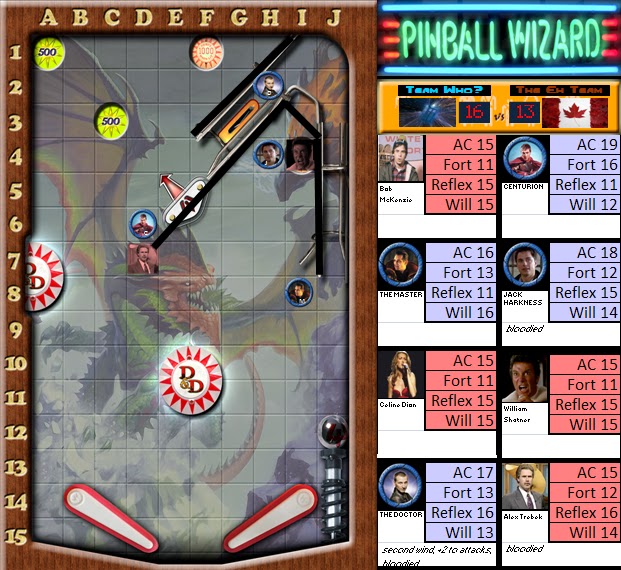
Reappear in G8 Drain to F10, stopped by bumper at F9, push to F7
Standard action: Freezing burst (burst 1 centered on H9. +6 vs Ref. 1d6+5dam, slide south 2 squares on both targets) action point. Standard Action: Charm of Misplaced Wrath vs Centurion. (+6 vs Will) on hit, slide to F16 (or F18 if I hit with freezing burst) minor action: magic missiles at Jack.
We've lost contact with David, so here's the Master's turn:
Fluff: The Master grins from ear to ear as he’s propelled through the mess. “If I’m going down, I’m taking you all with me.”
Tech: Plunger: To F7 colliding with Bob, stopping in G8 (combo 1). 1. Bob to F6->wall, the Master to H7->Trebek (2) 2. Trebek to the wall, the Master to G6->Bob (3) 3. Bob to wall, the Master to H5->I4 (drop target)
Drain: H5->Terbek (1) 1. Trebek H7->G8, the Master G5->Bob (2) 2. Bob G7->Trebek (3), the Master H5->I5 3. Trebek F9->bumber (4), Bob H6->the Master (5) 4. Trebek G8->H7 5. The Master I4->wall (no second drop target :( ), Bob I6->I7
Standard: Shout of Triumph vs. Bob and Trebek +6 vs. Fort. On a hit, 1d6+5 and push 2. If only one is hit, the push plus Lure of Enchantment moves the one hit to J12. If both are hit: Trebek I8->I9 Bob H8->Trebek (1) 1. Trebek I10->I11, Bob G9->bumper (2) 2. Bob H10->Trebek (3) 3. Trebek J12->wall, Bob G11->bumper (4) 4. Bob H12->I13 Use Lure of Enchantment on Bob H14-> G15->F16 :)
The ubiquity and anonymity of play by post really gets on my nerves sometimes. That's why I try my best to pair up teammates who know each other. That way, if you flake out, there's someone there in real life to hassle you and give you shit.
But I digress.
The Drop Target bloodies Bob, the snow turning a deep crimson. The Master shouts in TRIUMPH!!! Let loose the dogs of war! http://www.youtube.com/watch?v=gQddgc1h_2I
vs. Trebek: (12)+6 vs. Fortitude 12; HIT! for (3)+5 damage vs. Bob: (3)+6 vs. Fortitude 11; MISS! So close! Trebek is now bloodied at 5 HP and, more importantly, set up for a final round telefrag!
Celine Dion then makes her finale song, her encore performance, returning to the stage one last time.
Celine Dion has a stare that is drifting off into space, and for her lack of focus, she is punished!
CELINE DION IS GIBBED!!!
The Doctor then Respawns with a Push (2)+(2), getting a coveted TELEFRAG!!! on Alex Trebek! The Eh Team is rocked into double-digit deaths! Oh, the humanity!!!
Fluff: With the riot caused by Ms. Dion’s last performance ever (the rioters ritualistically sacrificing her does make it hard for a comeback… and the world rejoices), the entire board is thrown into chaos. The Doctor reappears and in his typical manner, tries to save everyone (of course, his failure rate on saving everyone is very high). Seeing that despite Mr. McKensie’s drunkenness (or possibly because of it), he’s not moving, so the Doctor focuses on Mr. Shatner.
“Mr. Shatner, the entire place is going up. I can save you just take my hand.” Mr. Shatner attempts to, but a last second jolt sends him towards his doom.
Tech: Plunger: To F8 Drain: E9->bumper->D8->D7
Standard: Charm of Misplaced Wrath vs. Mr. Shatner. +6 vs. Will, Human perseverance if necessary. On a hit, Mr. Shatner is dazed and slides E2->D3->C4->C5->C6->the Doctor (1) 1. Mr. Shatner B7->bumper (2), the Doctor D8->D7 2. Mr. Shatner C8->the Doctor (3) 3. Mr. Shatner B9->bumper (4), the Doctor into the bumper (5) 4. Mr. Shatner B10->B11 5. The Doctor C10->Mr. Shatner (6) 6. Mr. Shatner B12->B13, the Doctor D11->bumper (7) 7. The Doctor C12->Mr. Shatner (8) 8. Mr. Shatner A14->A15, the Doctor D11->bumper (9) 9. The Doctor C10->B9 Effect: Mr. Shatner hits himself with +2 damage.
Minor: Sustain Temporal Storm and the Master to H4->I4 (drop target)
Move->Minor: Temporal Storm shifts the Mater to I6
CHARM: (10)+6 vs. Will 15; HIT! WRATH: (2)+0 +2 {dazed} vs. AC 15; MISS! I think Combo 1 just has a type (for those keeping track) and should read D8-->D9, instead of D7. Everything else seems to jive up with that.
After the Drop Target, Bob is dying and Shatner is about to go with only 3 HP left.
And this is why you shouldn't be planning complex moves at 6 a.m. Yes that should be D9. The Master should be in I6... Don't worry about a map update, we should be able to handle that.
Rory, playing the same scene he's played in the past, the present, and the future, almost more times than time itself can count... stops in front of the Doctor. "We're dead aren't we?"
The Doctor stops what he's doing and deactivates his sonic screwdriver. "What, again? Well, yes, I'm sure. In fact, quite certain now."
"But you still want to save the world. Even a world that has... Canadians in it. Well, if there's any way to see Amy again. I'll do it."
"That's a good lad. Now do it again. Hit me." The Doctor unties his tie, pulls open his lapels and waits for it.
[Tech] Plunger: to E-7, stopped by wall. Drain: to E-10, stopped in D-9 by bumper, triggering Bumper 1. Bumper 1: to B-9, stopped in C-9 by the Doctor, triggering Combo Shot 1. Combo Shot 1: Doctor to A-8, stopped in B-9 by bumper, triggering Bumper 2. Centurion to E-10, stopped in D-9 by bumper, triggering Bumper 4. Bumper 2: Doctor to D-9, stopped in C-8 by Centurion, triggering Combo Shot 2. Combo Shot 2: Centurion to E-10, stopped in D-9 by the bumper, triggering Bumper 5. Doctor to A-7, stopped in B-7 by the bumper, triggering Bumper 3. Bumper 3: Doctor to D-5. Bumper 4: Centurion to D-7. Bumper 5: Centurion to D-5, stopped by the Doctor in C-6, triggering Combo Shot 3. Combo Shot 3: Doctor to F-4, through E-4. Centurion to A-7, stopped in B-6 by bumper, triggering Bumper 6. Bumper 6: Centurion to D-6.
Standard: Savage Reach against the Doctor. • Attack: +8 vs AC 10 (17, -5 voluntary helpless, -2 voluntary Unarmored Agility) • Hit: 1d10 (don't reroll if it's a 1) +5 damage, Doctor is slid to H-2, triggering Extra Ball. The Doctor respawns Trebek. Minor: Healing Word on the Doctor. Regains surge +1d6, +2 attack UENT (not that it matters?) Minor: Second Wind. +2 all defenses.
Wow, well I certainly do appreciate all the text formatting (bold, italics, bullets). This one's a doosy!
I'm pretty sure we clarified that Combo Shot's and Bumper's end all forced movement (so no queue'ing up infinite loops), but we're so far along and I have so little time before I'm away for a week that I'll let this go. Also, you can't voluntarily turn off the benefits of a feat.
Savage Reach: (5)+8 vs. AC 17 -5; HIT! for (3)+5 damage [Doctor at 16 HP], but then healed back up to full; 6+(3)
Jack appears and starts talking to Trebek. "So there I was, stranded in the year two-hundred-one-hundred, ankle deep in Dalek dust, he goes off without me. But I had this. I used to be a Time Agent, it's called a Vortex Manipulator. He's not the only one who can time travel..." "Excuse me," interrupts the Doctor, "that's not time travel. It's like, I've got a sports car, you've got a Space Hopper." "All right, so I bounced."
[tech]
I *think* this works. I am super-tired. Yell at me if it doesn't.
Plunger: To D5, stopped in G8 by Trebek Combo Shot 1: Trebek to D5, stopped in F7 by the wall; Jack to I6, stopped in H7 by the Master Combo Shot 2: The Master to K6, stopped in I6 by the wall, Jack to F7, stopped in G6 by Trebek Combo Shot 3: Trebek to D5, stopped in F5 by the wall; Jack to I4 to hit the Drop Target Drain: To F7, stopped in G6 by Trebek Combo Shot 4: Trebek to D7; Jack to I6, stopped in H6 by the Master Combo Shot 5: The Master to I4 to hit the Drop Target; Jack to F7. Standard: Fox's Feint vs Trebek, +9 vs AC. On hit: 2d4+5 damage, and we swap positions, then I teleport to C.
My attention to detail could use some work. Trebek gets tagged down to 13 HP from the Drop Target, and then still gets hit by Fox's Feint, but only for (1)+(3)+5 damage to be at 4 HP. Still alive!
Haven't we all shoved people into the wall like a dozen times so far?
Oh, and since I obviously can't teleport to where I was going to, I'll use the teleport from hitting Trebek to go to I4 and block the Drop Target there.
The intent of Combo Shot #5, to get The Master into a Drop target, was illegal. At that point, Jack and The Master were adjacent and the only available places to push would all keep them adjacent; hence, not a valid push.
Shatner comes back sees a tried and true formula and goes for it?
Tech: Plung to G5 Standard: Howling wall (+6 vs fortitude slide 3) targeting Jack and myself Hit on Jack: H5-H6-I6 trigger combo shot Hit on Shatner slide to I4 triggering drop target Combo Shot Push Jack to F8 Push the Master into the wall!
If I miss Jack with the howling wall slide Shatner to H5-I5-I4 triggering infinite combo shot loop, or just pout.
"Alright folks, we're finally in Final Jeopardy. I think everyone is sick of Alex Trebek and his utter pomposity, so I'll spare the pedantic questions and just get this show over with."
[TECH]
Drain to G10
Minor: Sustain the Whirlwind, slide Jack into the Master Combo Shot: Push the Master to I8, Jack to H4.
Minor: Slide Shatner onto the Drop Target.
Standard: Charm of Misplaced Wrath vs the Master +6 vs Will, use Heroic Effort if needed.
Hit: Slide him to G14 Effect: The Master makes a basic attack vs himself with a +2 to the damage roll.
If this drops him (unlikely though it be): Free: Shadow Warp vs the Master, and slide him 3 into the Drain. (triggers on me dropping an enemy to zero, so not sure if this would count).
If Charm... misses: The attack still happens, but is more or less irrelevant.
Free: do a little dance, and reveal himself as the robot everyone knows him to be before self-destructing. (He was just too good for this world...) http://www.youtube.com/watch?v=QpCsKKKAVKI&feature=related
OOC: Well fought everyone. This was a mind-bender, but fun regardless.
In the end, Trebek was just in it for the hooch...
(2)+6 vs. Will 13; MISS!
THUS ENDS THE NINTH MATCH OF FOURTHCORE TEAM DEATHMATCH!!!
THE EH TEAM IS DECLARED THE WINNER!!!
A big thank you! to everyone for your outstanding patience and understanding while we worked through the kinks of the map, and of course for working so hard to make a fun match!
Please use this post as a forum to vet out your thoughts and ideas regarding the design of the map. I, for one, think that maybe the Drop Target could stand to be tweaked down a bit, perhaps 5 damage instead of 10. My original proof-of-concept run of this was using pretty sub-optimal builds, and if nothing else, the Eh Team has taught us all just how deadly they can be.
Team Canada, I bow to your superior educations system, universal health care, and beer in every snow drift. I would like to subscribe to your newsletter. I will even grudgingly concede that curling is a sport.
That could work. As the main terrain hazard, the deadliness needs to be ramped up I think. Otherwise, with the scaled back drop targets this map would have an even lower kill count.
The drain should be stronger. Changing it to a pull straight down would certainly help. As is, it is way too easy to just bump off the central bumper when drained.
I think having bumpers and combo-shots end all forced movement is a great idea. It will greatly eliminate the ambiguity of how all the simultaneous forced movements are ordered...which will make this thing go so much more smoothly.
I think it wold also be fun to have more bonus points in the lower area. (perhaps just make them less powerful than the ones up top, like +2 damage or something).
On a slightly related note, the mid-match combo shot errata made our MBA-strong team lose OAs as a resource. Kurt suggested at the time that combo shots might trigger an OA even. Make it a game of "slide the wizard into the barbarian".
Ending all prior movement is a good simplifying rule for all the terrain-based forced movement. I also like the idea of lower-board incentives. Do you force yourself into the target near the drain so you can have CA? Hm...
It was interesting to see both teams with three-in-a-row in initiative. It basically meant the board was cleared every round (with the exception of voidsoul shenanigans). It wasn't as ridiculous as Match 2's four-in-a-row, but it makes it clear that initiative is a very strong factor in something as tactical as FTDM.
I think straight damage on combo shots would discourage them from happening, but there could be a kind of bonus points that grants you the ability to do damage when you combo shot into someone.
You'd need to cap the extra melee damage, as there's a potential for infinite combo shots. specifically right below the lower drop target and between the bumpers (of course being first level 25 +2s would gib anything).
Hmm, yeah. I like the idea of having the drain be only straight down. (Well, unless forced otherwise by the terrain - Otherwise if you roll high for your push and go straight up you can't ever actually roll down that chute, heh.) As it is, yeah, way too easy to use to trigger things. And I agree that perhaps a longer pull would be good. I certainly wasn't ever afraid of the drain.
Perhaps the humiliation should be straight down as well? Most of the time it happened it seemed to actually be tactically advantageous since the player got to decide the direction.
Even if it potentially hurt us, I liked the mid-match combo shot errata. It made the map suddenly make a lot more sense to play for me and feel a lot more natural. Stuff collides and then immediately reacts to that instead of piling up. It was a lot easier in my mind when coming up with something or plotting out a suggestion.
I agree with Rwaluchow that it'd be fun to have a bit more in the bottom of the map; as it is between the relative ease of ignoring the drain by using it to your advantage, the lower part of the map is pretty much ignored since there's little reason to go there.
Hmm. Not that it ever came into play, but I think I'd actually increase the die size on the flippers. As-is there's almost no chance of getting out of the lower map area unless you get the max roll. Although if drain is changed to just straight down, then there's already no way to get out of the lower half of the board unless someone is in just the right spot to combo shot you into a bumper.
(And now I'm going back to bemoaning the lack of 3D Space Cadet Pinball in Windows Vista. A pox on your mahjong, OS.)

Bob McKenzie reappears into the world to start this round off.
ReplyDeleteBack from the beer fridge and yet again there's vermin lying around dying in my living room, nothing to be done but expel the hosers one more time I suppose...
ReplyDeleteReappear in G8
Drain to F10, stopped by bumper at F9, push to F7
Standard action: Freezing burst (burst 1 centered on H9. +6 vs Ref. 1d6+5dam, slide south 2 squares on both targets)
action point.
Standard Action: Charm of Misplaced Wrath vs Centurion. (+6 vs Will) on hit, slide to F16 (or F18 if I hit with freezing burst)
minor action: magic missiles at Jack.
P.S. if Centurion isn't off the board after Charm of mis...etc. I'll have him attack himself.
DeleteA blast of cold, wintry Canadian air!
Deletevs. Jack: (20) CRITICAL HIT!
vs. Centurion: (7)+6 vs. Reflex 11 -5; HIT!
for 11 and (5)+5 damage respectively.
THE CENTURION IS GIBBED!!!
and after the magic missile ...
JACK HARKNESS IS GIBBED!!!
Action Point is just stashed away in your pocket there.
The Master makes his swan song with a Respawn Push (3)+(2)!
We've lost contact with David, so here's the Master's turn:
ReplyDeleteFluff:
The Master grins from ear to ear as he’s propelled through the mess. “If I’m going down, I’m taking you all with me.”
Tech:
Plunger: To F7 colliding with Bob, stopping in G8 (combo 1).
1. Bob to F6->wall, the Master to H7->Trebek (2)
2. Trebek to the wall, the Master to G6->Bob (3)
3. Bob to wall, the Master to H5->I4 (drop target)
Drain: H5->Terbek (1)
1. Trebek H7->G8, the Master G5->Bob (2)
2. Bob G7->Trebek (3), the Master H5->I5
3. Trebek F9->bumber (4), Bob H6->the Master (5)
4. Trebek G8->H7
5. The Master I4->wall (no second drop target :( ), Bob I6->I7
Standard: Shout of Triumph vs. Bob and Trebek +6 vs. Fort. On a hit, 1d6+5 and push 2.
If only one is hit, the push plus Lure of Enchantment moves the one hit to J12.
If both are hit:
Trebek I8->I9
Bob H8->Trebek (1)
1. Trebek I10->I11, Bob G9->bumper (2)
2. Bob H10->Trebek (3)
3. Trebek J12->wall, Bob G11->bumper (4)
4. Bob H12->I13
Use Lure of Enchantment on Bob H14-> G15->F16 :)
Move: Makes some popcorn
Minor: Eats said popcorn
The ubiquity and anonymity of play by post really gets on my nerves sometimes. That's why I try my best to pair up teammates who know each other. That way, if you flake out, there's someone there in real life to hassle you and give you shit.
DeleteBut I digress.
The Drop Target bloodies Bob, the snow turning a deep crimson. The Master shouts in TRIUMPH!!! Let loose the dogs of war! http://www.youtube.com/watch?v=gQddgc1h_2I
vs. Trebek: (12)+6 vs. Fortitude 12; HIT!
for (3)+5 damage
vs. Bob: (3)+6 vs. Fortitude 11; MISS! So close!
Trebek is now bloodied at 5 HP and, more importantly, set up for a final round telefrag!
Celine Dion then makes her finale song, her encore performance, returning to the stage one last time.
Turn on your lighters. Raise them high overhead.
TIME'S UP!!!
DeleteCeline Dion has a stare that is drifting off into space, and for her lack of focus, she is punished!
CELINE DION IS GIBBED!!!
The Doctor then Respawns with a Push (2)+(2), getting a coveted TELEFRAG!!! on Alex Trebek! The Eh Team is rocked into double-digit deaths! Oh, the humanity!!!
Fluff:
ReplyDeleteWith the riot caused by Ms. Dion’s last performance ever (the rioters ritualistically sacrificing her does make it hard for a comeback… and the world rejoices), the entire board is thrown into chaos. The Doctor reappears and in his typical manner, tries to save everyone (of course, his failure rate on saving everyone is very high). Seeing that despite Mr. McKensie’s drunkenness (or possibly because of it), he’s not moving, so the Doctor focuses on Mr. Shatner.
“Mr. Shatner, the entire place is going up. I can save you just take my hand.” Mr. Shatner attempts to, but a last second jolt sends him towards his doom.
Tech:
Plunger: To F8
Drain: E9->bumper->D8->D7
Standard: Charm of Misplaced Wrath vs. Mr. Shatner. +6 vs. Will, Human perseverance if necessary. On a hit, Mr. Shatner is dazed and slides E2->D3->C4->C5->C6->the Doctor (1)
1. Mr. Shatner B7->bumper (2), the Doctor D8->D7
2. Mr. Shatner C8->the Doctor (3)
3. Mr. Shatner B9->bumper (4), the Doctor into the bumper (5)
4. Mr. Shatner B10->B11
5. The Doctor C10->Mr. Shatner (6)
6. Mr. Shatner B12->B13, the Doctor D11->bumper (7)
7. The Doctor C12->Mr. Shatner (8)
8. Mr. Shatner A14->A15, the Doctor D11->bumper (9)
9. The Doctor C10->B9
Effect: Mr. Shatner hits himself with +2 damage.
Minor: Sustain Temporal Storm and the Master to H4->I4 (drop target)
Move->Minor: Temporal Storm shifts the Mater to I6
CHARM: (10)+6 vs. Will 15; HIT!
ReplyDeleteWRATH: (2)+0 +2 {dazed} vs. AC 15; MISS!
I think Combo 1 just has a type (for those keeping track) and should read D8-->D9, instead of D7. Everything else seems to jive up with that.
After the Drop Target, Bob is dying and Shatner is about to go with only 3 HP left.
THE CENTURION RESPAWNS WITH A PUSH (5)+(4)!
Ha! I typo'ed "typo"
DeleteEvery time you make a typo, the errorists win
DeleteAnd this is why you shouldn't be planning complex moves at 6 a.m. Yes that should be D9. The Master should be in I6... Don't worry about a map update, we should be able to handle that.
ReplyDeleteOk, it's six AM. Time to plan some complex moves.
ReplyDeleteRory, playing the same scene he's played in the past, the present, and the future, almost more times than time itself can count... stops in front of the Doctor. "We're dead aren't we?"
The Doctor stops what he's doing and deactivates his sonic screwdriver. "What, again? Well, yes, I'm sure. In fact, quite certain now."
"But you still want to save the world. Even a world that has... Canadians in it. Well, if there's any way to see Amy again. I'll do it."
"That's a good lad. Now do it again. Hit me." The Doctor unties his tie, pulls open his lapels and waits for it.
[Tech]
Plunger: to E-7, stopped by wall.
Drain: to E-10, stopped in D-9 by bumper, triggering Bumper 1.
Bumper 1: to B-9, stopped in C-9 by the Doctor, triggering Combo Shot 1.
Combo Shot 1: Doctor to A-8, stopped in B-9 by bumper, triggering Bumper 2. Centurion to E-10, stopped in D-9 by bumper, triggering Bumper 4.
Bumper 2: Doctor to D-9, stopped in C-8 by Centurion, triggering Combo Shot 2.
Combo Shot 2: Centurion to E-10, stopped in D-9 by the bumper, triggering Bumper 5. Doctor to A-7, stopped in B-7 by the bumper, triggering Bumper 3.
Bumper 3: Doctor to D-5.
Bumper 4: Centurion to D-7.
Bumper 5: Centurion to D-5, stopped by the Doctor in C-6, triggering Combo Shot 3.
Combo Shot 3: Doctor to F-4, through E-4. Centurion to A-7, stopped in B-6 by bumper, triggering Bumper 6.
Bumper 6: Centurion to D-6.
Standard: Savage Reach against the Doctor.
• Attack: +8 vs AC 10 (17, -5 voluntary helpless, -2 voluntary Unarmored Agility)
• Hit: 1d10 (don't reroll if it's a 1) +5 damage, Doctor is slid to H-2, triggering Extra Ball. The Doctor respawns Trebek.
Minor: Healing Word on the Doctor. Regains surge +1d6, +2 attack UENT (not that it matters?)
Minor: Second Wind. +2 all defenses.
Wow, well I certainly do appreciate all the text formatting (bold, italics, bullets). This one's a doosy!
DeleteI'm pretty sure we clarified that Combo Shot's and Bumper's end all forced movement (so no queue'ing up infinite loops), but we're so far along and I have so little time before I'm away for a week that I'll let this go. Also, you can't voluntarily turn off the benefits of a feat.
Savage Reach: (5)+8 vs. AC 17 -5; HIT!
for (3)+5 damage [Doctor at 16 HP], but then healed back up to full; 6+(3)
Trebek respawns and gets pushed (3)+(2) squares!
Trebek will push to F7.
ReplyDeleteThe captcha just had me type "akstab." Hmm...
DeleteAnd Jack Harkness respawns witha Push (6)+(1)!
ReplyDeleteJack appears and starts talking to Trebek.
ReplyDelete"So there I was, stranded in the year two-hundred-one-hundred, ankle deep in Dalek dust, he goes off without me. But I had this. I used to be a Time Agent, it's called a Vortex Manipulator. He's not the only one who can time travel..."
"Excuse me," interrupts the Doctor, "that's not time travel. It's like, I've got a sports car, you've got a Space Hopper."
"All right, so I bounced."
[tech]
I *think* this works. I am super-tired. Yell at me if it doesn't.
Plunger: To D5, stopped in G8 by Trebek
Combo Shot 1: Trebek to D5, stopped in F7 by the wall; Jack to I6, stopped in H7 by the Master
Combo Shot 2: The Master to K6, stopped in I6 by the wall, Jack to F7, stopped in G6 by Trebek
Combo Shot 3: Trebek to D5, stopped in F5 by the wall; Jack to I4 to hit the Drop Target
Drain: To F7, stopped in G6 by Trebek
Combo Shot 4: Trebek to D7; Jack to I6, stopped in H6 by the Master
Combo Shot 5: The Master to I4 to hit the Drop Target; Jack to F7.
Standard: Fox's Feint vs Trebek, +9 vs AC. On hit: 2d4+5 damage, and we swap positions, then I teleport to C.
The Drop Target splats! Bob McKenzie.
DeleteBOB MCKENZIE IS GIBBED!!!
The Master's push is illegal, he's pressed up against the wall and only has adjacent squares to look to.
Fox's Feint! (14)+9 vs. AC 15 -5; COUPE DE GRACE!
for (4)+(4)+5 damage!
ALEX TREBEK IS GIBBED!!!
Will Shatner then takes his turn and Respawns, dying, and then getting a push (2)+(5).
Time to retire, Admiral.
Craaaaaaaaaaaaaaaaap!
DeleteMy attention to detail could use some work. Trebek gets tagged down to 13 HP from the Drop Target, and then still gets hit by Fox's Feint, but only for (1)+(3)+5 damage to be at 4 HP. Still alive!
Map updates momentarily.
Haven't we all shoved people into the wall like a dozen times so far?
ReplyDeleteOh, and since I obviously can't teleport to where I was going to, I'll use the teleport from hitting Trebek to go to I4 and block the Drop Target there.
The intent of Combo Shot #5, to get The Master into a Drop target, was illegal. At that point, Jack and The Master were adjacent and the only available places to push would all keep them adjacent; hence, not a valid push.
DeleteShatner comes back sees a tried and true formula and goes for it?
ReplyDeleteTech:
Plung to G5
Standard: Howling wall (+6 vs fortitude slide 3) targeting Jack and myself
Hit on Jack: H5-H6-I6 trigger combo shot
Hit on Shatner slide to I4 triggering drop target
Combo Shot
Push Jack to F8
Push the Master into the wall!
If I miss Jack with the howling wall slide Shatner to H5-I5-I4 triggering infinite combo shot loop, or just pout.
and Minor: magic missile jack
DeleteHowling Wall vs. Jack: (5)+6 vs. Fortitude 12; MISS! Oh no! Damn close!
ReplyDeleteHowling Wall vs. Shatner: (4)+6 vs. Fortitude 11 -5; HIT!
Jack is pinged for 7 damage and Trebek takes his turn!
"Alright folks, we're finally in Final Jeopardy. I think everyone is sick of Alex Trebek and his utter pomposity, so I'll spare the pedantic questions and just get this show over with."
ReplyDelete[TECH]
Drain to G10
Minor: Sustain the Whirlwind, slide Jack into the Master
Combo Shot: Push the Master to I8, Jack to H4.
Minor: Slide Shatner onto the Drop Target.
Standard: Charm of Misplaced Wrath vs the Master
+6 vs Will, use Heroic Effort if needed.
Hit: Slide him to G14
Effect: The Master makes a basic attack vs himself with a +2 to the damage roll.
If this drops him (unlikely though it be):
Free: Shadow Warp vs the Master, and slide him 3 into the Drain. (triggers on me dropping an enemy to zero, so not sure if this would count).
If Charm... misses: The attack still happens, but is more or less irrelevant.
Free: do a little dance, and reveal himself as the robot everyone knows him to be before self-destructing. (He was just too good for this world...)
http://www.youtube.com/watch?v=QpCsKKKAVKI&feature=related
OOC: Well fought everyone. This was a mind-bender, but fun regardless.
In the end, Trebek was just in it for the hooch...
Delete(2)+6 vs. Will 13; MISS!
THUS ENDS THE NINTH MATCH OF FOURTHCORE TEAM DEATHMATCH!!!
THE EH TEAM IS DECLARED THE WINNER!!!
A big thank you! to everyone for your outstanding patience and understanding while we worked through the kinks of the map, and of course for working so hard to make a fun match!
Please use this post as a forum to vet out your thoughts and ideas regarding the design of the map. I, for one, think that maybe the Drop Target could stand to be tweaked down a bit, perhaps 5 damage instead of 10. My original proof-of-concept run of this was using pretty sub-optimal builds, and if nothing else, the Eh Team has taught us all just how deadly they can be.
Team Canada, I bow to your superior educations system, universal health care, and beer in every snow drift. I would like to subscribe to your newsletter. I will even grudgingly concede that curling is a sport.
ReplyDeleteGood game. Fun map.
Also, this was the WORST map to DM. Ever.
ReplyDeleteThe Combo Shots are about 1000x harder to figure out in play-by-post than at the table.
Howling Wall for the Win!
ReplyDeleteThe PbP High Scores have been updated. Congratulations to Rob for having the highest number of wins IN THE WORLD.
ReplyDeleteBFlat is giving him a run for his money, though ...
There can be only one!
Deletehttp://www.youtube.com/watch?v=mqhHgT4mvRQ
DeleteYes, I bow to Rob's Northern superiority. And watch as I am no longer tied for first in FTDM awesome. *pout*
DeleteOk, Rob, time to run a match!
Thank you, sir.
DeleteI'm working on a new map that should be fairly straightforward, so maybe I will run it for my first match.
I would be rather slow, though, as I am not equipped to perform map updates at work :(
I think bumpers and combo shots should be changed so that all forced movement ends, rather than just the triggering movement.
ReplyDeleteAlso, maybe the drain pull should be stronger? I don't know if it will matter, but I wasn't ever in fear of falling into the drain.
Yeah I agree with you on both points.
DeleteWhat do you think about having the Drain only go straight down, no diagonals?
That could work. As the main terrain hazard, the deadliness needs to be ramped up I think. Otherwise, with the scaled back drop targets this map would have an even lower kill count.
DeleteI agree.
ReplyDeleteThe drain should be stronger. Changing it to a pull straight down would certainly help. As is, it is way too easy to just bump off the central bumper when drained.
I think having bumpers and combo-shots end all forced movement is a great idea. It will greatly eliminate the ambiguity of how all the simultaneous forced movements are ordered...which will make this thing go so much more smoothly.
I think it wold also be fun to have more bonus points in the lower area. (perhaps just make them less powerful than the ones up top, like +2 damage or something).
What about the happening both at the start and end of turn?
Deleteperhaps you could have combo shots do minor damage to both colliding characters, like 1d4, or a straight 2 damage...
ReplyDeleteOn a slightly related note, the mid-match combo shot errata made our MBA-strong team lose OAs as a resource. Kurt suggested at the time that combo shots might trigger an OA even. Make it a game of "slide the wizard into the barbarian".
DeleteEnding all prior movement is a good simplifying rule for all the terrain-based forced movement. I also like the idea of lower-board incentives. Do you force yourself into the target near the drain so you can have CA? Hm...
It was interesting to see both teams with three-in-a-row in initiative. It basically meant the board was cleared every round (with the exception of voidsoul shenanigans). It wasn't as ridiculous as Match 2's four-in-a-row, but it makes it clear that initiative is a very strong factor in something as tactical as FTDM.
I think straight damage on combo shots would discourage them from happening, but there could be a kind of bonus points that grants you the ability to do damage when you combo shot into someone.
DeleteGranting a cumulative +2 to melee damage rolls per Combo Shot would help encourage melee builds.
DeleteYou'd need to cap the extra melee damage, as there's a potential for infinite combo shots. specifically right below the lower drop target and between the bumpers (of course being first level 25 +2s would gib anything).
DeleteHmm, yeah. I like the idea of having the drain be only straight down. (Well, unless forced otherwise by the terrain - Otherwise if you roll high for your push and go straight up you can't ever actually roll down that chute, heh.) As it is, yeah, way too easy to use to trigger things. And I agree that perhaps a longer pull would be good. I certainly wasn't ever afraid of the drain.
ReplyDeletePerhaps the humiliation should be straight down as well? Most of the time it happened it seemed to actually be tactically advantageous since the player got to decide the direction.
Even if it potentially hurt us, I liked the mid-match combo shot errata. It made the map suddenly make a lot more sense to play for me and feel a lot more natural. Stuff collides and then immediately reacts to that instead of piling up. It was a lot easier in my mind when coming up with something or plotting out a suggestion.
I agree with Rwaluchow that it'd be fun to have a bit more in the bottom of the map; as it is between the relative ease of ignoring the drain by using it to your advantage, the lower part of the map is pretty much ignored since there's little reason to go there.
Hmm. Not that it ever came into play, but I think I'd actually increase the die size on the flippers. As-is there's almost no chance of getting out of the lower map area unless you get the max roll. Although if drain is changed to just straight down, then there's already no way to get out of the lower half of the board unless someone is in just the right spot to combo shot you into a bumper.
(And now I'm going back to bemoaning the lack of 3D Space Cadet Pinball in Windows Vista. A pox on your mahjong, OS.)